I won! Creating a top-notch game with Phaser in under 2 weeks
Ever wondered what it takes to transform a simple idea into an award-winning game in just two weeks? Come along as I share my challenging and exciting experience in this year's Gamedev.js game jam.
Updated: Jul 20, 2024
Published: Jul 20, 2024
Puckit! – Post Mortem
It's time for the annual Gamedev.js game jam. My favorite game jam of the year. This is the fourth time I'm participating, and I'm making a plan to create a minimalistic 2D game that plays so well on mobile that I can look for publishers right away. Keep reading to learn about my process, and what you need to consider to craft a top notched game, potentially winning prices and cash monitas💰. I present the results at end of my blog post.
Play the game here: https://puckit.reitgames.com (this version has been updated post jam. If you want to play the game actually submitted to the game jam, find it here https://reitgames.itch.io/puckit)
Calm before the storm
I almost didn't join this year. Game jams are exhilarating but exhausting, demanding immense time and sacrifice, often at the expense of sleep, social life, and other hobbies. But when the theme was revealed—Power—I couldn't resist. Despite the looming challenge of two sleepless weeks, excitement won over reluctance.
This theme sparked some additional ideas on top of a game I've been itching to make, and I thought it could be a good opportunity to create a prototype and gather feedback. Nothing is better than a game jam for getting feedback, validating your idea, and assess if it's good or bad.
Inspiration and game feel
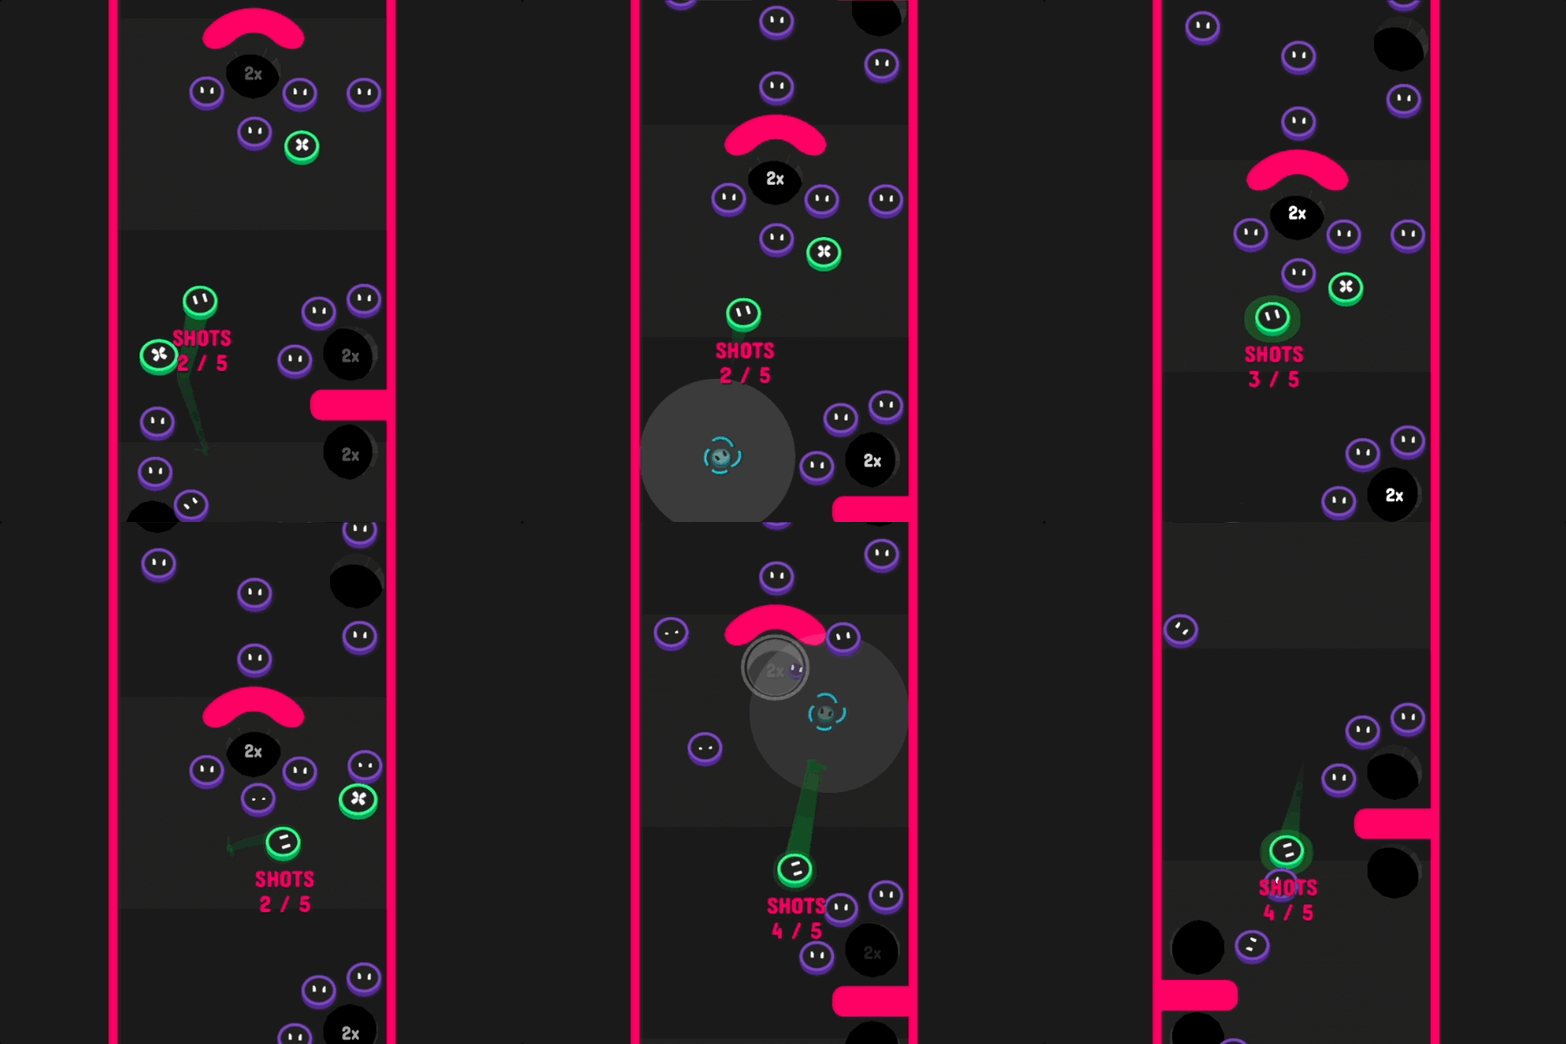
The inspiration for Puckit! came from an infinite pool game called Infinite Pool. If you've played it, you might notice I borrowed (stole) quite a bit from it. The similarities are clear from the screenshot below.

Tip: Look at games you enjoy and identify what makes them engaging.
Simple mechanics combined with game feel, or 'juice,' is crucial in making a game fun and engaging. It breathes life into your game and keeps players hooked. Consider games like Candy Crush and Angry Birds: their mechanics are simple, but they add a lot of content around them. Just like a little salt and pepper can enhance a dish, the right additions can significantly improve a game. An important part of this is the animations and effects (both visual and sound.) These points were the focus of my game as well. Concentrate on one core mechanic, sprinkle it with spice, and juice it up.
Don't spend too much on tweaking the juicy effects though, or you'll never finish your game. If you have something that works, and looks good, then that's more than enough. Don’t aim for perfection. Most of the visual effects and animations in Puckit! were made with some quick and easy Phaser Tweens (Easing,) and some cheap 2D animation tricks using Spine 2D, a 2D keyframe animation tool.
Animating the explosion puck
I mentioned cheap animation tricks, and I will give you an example. One of my favorite effects in Puckit! is the green puck explosion. Using Spine 2D, I created an animation that scales, shears (skews,) and rotates the puck, resulting in a satisfying visual effect. Without going into details, I changed the transformation of the puck for a number of key animation frames, and let the tool do the interpolation for me. Learning the tool takes some time, but I think it's fast and easy to use compared to doing the same with code. You only need to know the basics to achieve what I did in the explosion animation (and other animations too.)

I will show you how to add these effects in Phaser in the next section, "Technical implementation." I won't go through how to work with Spine 2D, but I will briefly explain how to use them in Phaser.
Technical implementation
Creating seamless animations in Phaser involved coordinating multiple animations. When the puck explodes, a white circle expands and fades out, while the puck itself changes color and fades away. This combination consists of two different animations: the puck's animation made in Spine 2D, and the white circle animation created using Phaser Tweens. These animations are synchronized to run at the correct times. (Take a look at the short animation in the previous section.)
Then, how can we combine an animation made with Spine 2D, and one make in code? How do we coordinate it?
In Phaser, we can listen for events from Spine 2D animations and detect when animations are complete. This allows us to trigger other animations, apply forces to nearby objects, and remove objects from the game to free up memory. Not only that, but Spine 2D can also send custom events from the animation tool. We can react to those events in Phaser as well.
Here's the explode animation of the power puck made with Spine 2D
Here's an example of how we can coordinate the Spine 2D animation and the Phaser animation using code
playExplodeAnimation.js
// Simplified version of how to coordinate animations
function playExplodeAnimation(){
  // powerPuck is a Spine Object, our Spine 2D animation
  // 0 means track number 0, 'explode' is the animation name, and false means it should not loop.
  powerPuck.animationState.setAnimation(0, 'explode', false);
  const listener = {
    event: (entry, event) => {
      // playExplodeRing is a custom event that we trigger from the Spine 2D animation.
      if (entry.animation.name === 'explode' && event.data.name === 'playExplodeRing') {
        // This is where we play the white ring that expands and fades out
        renderWhiteRing(
          powerPuck.position.x, powerPuck.position.y)
        );
      }
    },
    complete: (trackEntry) => {
      if (trackEntry.animation.name === 'explode') {
        // play the die animation of the power Puck
        powerPuck.animationState.setAnimation(0, 'die', false);
        // cleanup the listener
        powerPuck.removeListener(listener);
        // a function that applies force from the position
        // makes pucks in proximity fly
        applyForce(powerPuck.position.x, powerPuck.position.y)
      }
    },
  };
  powerPuck.animationState.addListener(listener);
}
Recording audio
Tip: Creating your own sound effects can be quicker and more satisfying than searching for the perfect sound online. Record unique sounds using everyday objects.
Music and sound effects are important to give the game some extra pop. I struggle to find good audio that works well for my games. I try my best to create the sound effects myself because it's more rewarding, and I'm often satisfied with the result. It takes some time to make sounds yourself, especially music, but not too much considering the time it would take trying to find "the right sound" on the Internet.
I didn't create the music for my game. I chopped up and mixed an existing tune that I've bought in the past. However, I made all the sound effects myself. For Puckit!, I used my son’s building blocks to create realistic collision sounds. Experiment with different materials and see what unique effects you can produce. I added some reverb, compression and noise reduction in my Ableton Live DAW (Digital Audio Workstation.) Here's a short video of how I did it
In my experience, trying to find the same sounds on the Internet is difficult, especially if you try to find something that's free. If you only need a few effects, I think it's easier and faster to record them yourself. You don't need more than a cell phone to record it, and you can find similar effects/filters in free DAWs, such as Audacity.
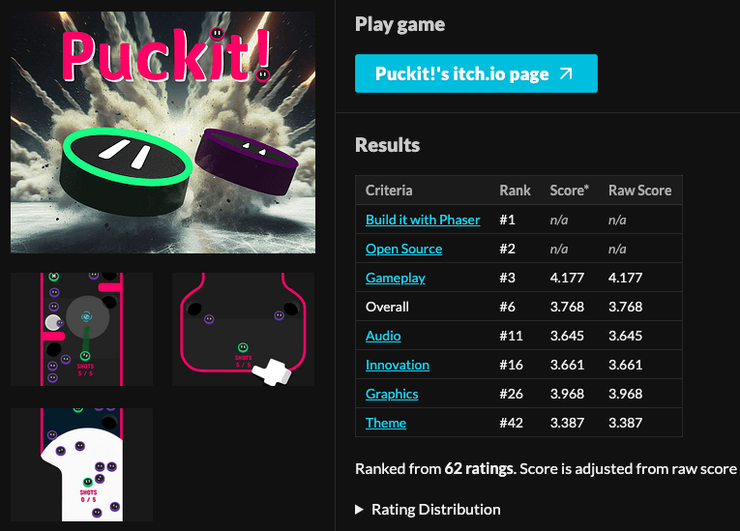
My game placed 11 in the audio category, and I believe the easy tricks I made with the sound effects helped me rank high in that category.
Explosion sounds
Can you guess how I made the explosion sounds in the game? Those sounds are actually me making "explosion sounds" with my mouth. I made the animation first, then I timed my "explosion sound" with the animation, added some audio effects on top, and called it a day. You can see how I did it in the video above as well.
Better off without an editor
Engines such as Godot, Unreal, and Unity all come with an editor, a visual tool to make game development easier and faster. Phaser also have an editor, but it’s not the main part of the engine, and it costs money to use it (I think you can start a trial version for free.) Editors have their pros and cons. For me, they’re a time sink. I wrote a blog post about why I prefer Phaser over Unity here.
First, you need to learn how to use the editor. Not only that, but you’re often bound to the limitations of what the editor can do. For Unity and Unreal, you need to use the editor, but with Phaser you don’t have to. Don’t get me wrong, there are a lot of reasons to use an editor, it’s just that I work faster without one.
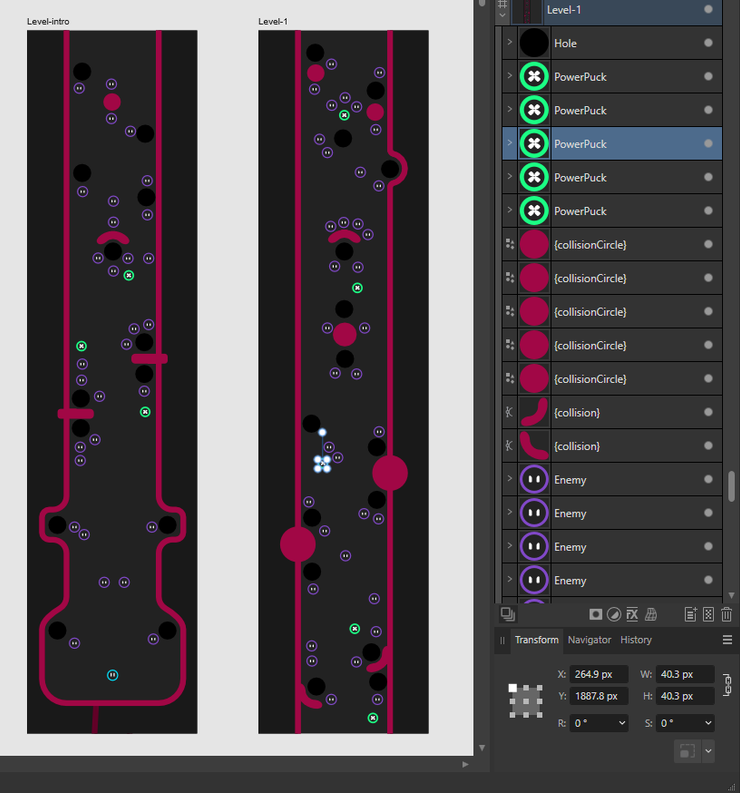
There's one thing an editor excels at, and that's level design. Trying to create a level by code directly in the game engine is a hassle. If I'm not using Phaser Studio, then how do I create the levels? I use a vector editing tool called Affinity Designed (similar to Gimp and Illustrator.) I create levels using curves and simple shapes, which I export to SVG. The beauty with SVG when it comes to JavaScript is that we can read the data as though it was HTML, since they share the same structure. We can use the `document` in the browser to query the SVG, and create game related objects. I can position enemies, and holes in Affinity Designer, and create them at the exact same location in the game. The walls are SVG-paths, which I draw in Phaser using curves. This workflow works great as a solo dev.
Here's a screenshot of the two sections used in the game. On the right side of the screenshot, we have the layers panel.

For example, when creating the collision circles, I can do it like the following
createCollisionCircles.js
// example of how you can parse SVG to create a level
function createCollisionCircles(svgText){
  const circles = [];
  // note that the svgText is the raw SVG-file
  const svgDoc = parser.parseFromString(svgText, 'image/svg+xml'); // returns a Document
  const circleEls = svgDoc.querySelectorAll("circle[id^='_-collisionCircle']");
  ciclesEls.forEach((el) => {
    // el is the element of the circle itself, and looks like this
    // <circle id="_-collisionCircle-" serif:id="{collisionCircle}" cx="174.077" cy="2265.53" r="66"/>
    const cx = el.getAttribute('cx');
    const cy = el.getAttribute('cy');
    circles.push(new CollisionCircle(~~cx, ~~cy)); // ~~ is a double Bitwise NOT operator. It's a trick to convert a string to a number, and also remove the decimal part of the number
  }
  return circles;
}
Result
I want to reflect on my results. Gameplay is the category I care the most about. I'm always happy if I rank well in gameplay. Graphics and Audio are important too, but it doesn't matter if the game is unplayable.
I always rank low in "Theme." I tried my best to keep the game aligned with it, but I admit it's a little far fetched. The core mechanic of the game isn't very power oriented. I was thinking batteries, and I intended to make the pucks "protons" and "electrons," but I wasn't able to execute it well. If I want to place first in future game jams, I really need to focus more on implementing the theme.

Making deals with publishers
Tip: Stay on top and stay proactive with publishers. Don't wait for them to come to you.
I've been in contact with publishers in the past, but haven't uploaded anything to their platforms. Submitting games in game jams with publishers as sponsors are a great way to make new connections, and having your game seen, which increases your chances of getting it published. Puckit! will be the first game I pitch, almost to the point of being annoying. I'm already in contact with a few publishers where the plan is to release Puckit! on their online platforms and share ad revenue. I've learned that it's important to push and stay on top of the conversation, as well as showing initiative, and proactively inform them with updates. Nothing will be handed to you.
To publish my game on their platforms, I need to integrate the publishers' SDK, and make adjustments based on the platform's needs. Phaser is a web based game-engine, making it straight forward to integrate SDKs. The first time is always the most difficult, but the integration is similar with different publishers, and won't require that much additional effort if you've done it once before.
All my Gamedev.js game jam entries
Here's a list of all the games I've made for the annual Gamedev.js game jam. My placement gets better for every year, and I get more and more motivated because of it. My goal is to be the best rated game overall. Looking at my progress, maybe my game next year will the one?
- 2025 - UnnamedGame 1st out of 337 entries (we'll see)
- 2024 – Puckit! 6th out of 232 entries
- Best Phaser game 🥇
- Second best Open Source game 🥈
- 2023 – Toki 33rd out of 194 entries
- 2022 – Clash of Cuisine 29th out of 91 entries
- 2021 – Mirrors 46th out of 85 entries
I highlight my games, even the "not so good ones" because I want to stress that you need to create crappy games before you're able to create a good one. My first game, Mirrors, was made as a prototype for an idea I had. I just picked up game development in my spare time, and a lot of effort went into just learning. I've spent time learning tools, game engines, game development coding practices and a lot more. Doing this helps you realize what you like, what you are comfortable with, what takes time, and what ideas/features to scrap.
What’s the most challenging part of game development for you? Share your experiences in the comments below.
The future of Puckit!
The game jam is over, but Puckit! is not. To reach a larger audience on platforms such as Poki and Crazy Games, the game needs some more content to make it repayable.
Let me know if you played the game. I’m eager to know what you think would be great additions, and I also want to know what you liked the most. Leave a comment on this post about ideas and suggestions. Is the game too difficult? Are the controls easy to use? Anything is appreciated.
A few ideas
- Make individual handcrafted levels with increasing difficulty. For each level, add a bonus meter, and when filled up, unlock a new skin for your puck.
- Make it rogue-like, getting upgrades and new skills the more you progress through levels, which you can use if you die.
- Keep the current state of the game as a selectable mode, Score Attack.
- Add monetization on top of this can prove to be a steady source of income, hopefully one that can sustain for many years.
I believe in incremental changes, and want to publish the game as soon as possible. Improvements will be added based on feedback from players (please let me know!)
First impressions are crucial, and the first 10 seconds are vital for my audience. If they’re not hooked before 10 seconds, they’re likely to leave and play another game. Once hooked, I also need them to keep playing to make the game a success.
Key Takeaways
- One idea, one mechanic
- Add juice to make the game feel alive
- Don't aim for perfection, focus on finishing your game
- Creating “crappy” games is part of the journey to making great ones. Each project teaches valuable lessons that improve your skills and understanding of game development
Don't hesitate to reach out via my contact form, or 𝕏@ReitGames. I'm here to assist you on your game development journey. You can also leave comments directly on this blog post via the discussion thread below.
Consider sharing this post and following me on 𝕏@ReitGames. Subscribe to my newsletter to get notified about new posts about game development.
Happy coding!
