Slicing with Samurai Sam, a js13kgames entry
Samurai Sam is a game where you slice through objects and blazing arrows in your quest to defeat the Mongol army invasion in 13th century Japan. I write about my journey creating this game from start to finish.
Updated: Oct 8, 2023
Published: Sep 11, 2023
Samurai Sam
It's the 13th century, and you play as a fierce Samurai, defending Japan against the Mongol invasion. This is my tale of creating "Samurai Sam," a JavaScript game made in less than a month under 13KB.
Play the game here: https://js13kgames.com/entries/samurai-sam.
The progress
I posted updates on Twitter (X) almost every other day, https://twitter.com/ReitGames, and I will share my story in this blog post.
Ideation
I tend to create my games based on an idea I have (even before the theme is announced.) This time, I wanted to see if I were able to slice through SVGs, similar to what you can do in vector programs such as Gimp, Illustrator, or my personal favorite, Affinity Designer.
I always prototype an idea on paper or in Affinity Designer. It's always helpful to have a goal before we start programming. 2 weeks of development can save 2 hours of planning.
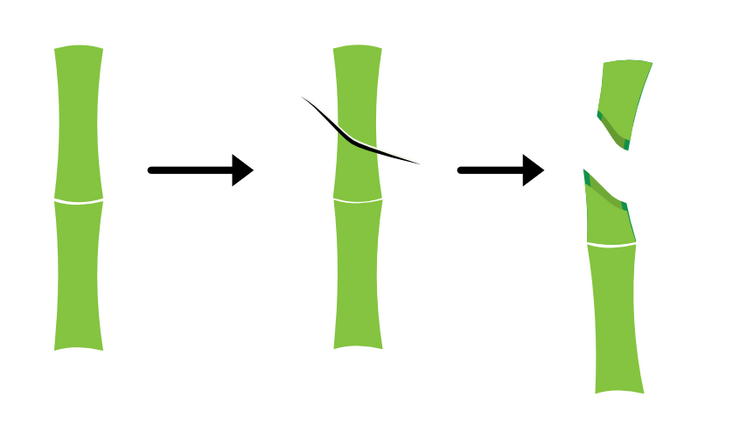
I have drawn my idea in the image below. We have a bamboo tree, then we slice it with our finger, and cu the object in half. Simple, right?
Next, I played around with the "knife" tool in Affinity Designer, trying to understand how it works on a lower level. Draw a cut in the SVG shape to split it into two new shapes. I wanted to copy the exact same feature as the main game mechanic for my game.

The idea sounds simple, but the implementation not so much. I quickly realized that this may have been over my head.
Bézier Curves, Math, Back to School
The graphics in my game consists of SVGs, that is, several points that describes how lines and curves in the graphics should be drawn, and I'm using the canvas 2D context to draw the curves. The canvas context API has several useful methods for drawing curves. I use one built in function, fill, which takes a path as its argument:
render-svg.js
const bambooPath = 'M1,0.3C3.2,5.6 17.3,3.6 18.4,0.2C19.6,-3.1 17.3,104.1 18.4,120C19.1,130 -1,129.7 0,120C2.1,100.3 -1.4,-5.8 1,0.3Z';

render(ctx){ // The canvas context
  ctx.fill(bambooPath);
}
The bambooPath is a string with instructions on how to draw the SVG.
Let's break it down:
M1,0.3, is the first command, and means move to coordinate 1,0.3- Then we have a series of C-commands, e.g.
C3.2,5.6 17.3,3.6 18.4,0.2, which means to create a Cubic Bézier curve. - Lastly, we have the command
Z, which means close path
The fill function on the canvas context can understand this path, and draw our shape accordingly. Under the hood, it's using other available functions such as moveTo and bezierCurveTo.
A Bézier curve consists of 4 points, a start point, two control points, and an endpoint. You may have noticed that each C-section in the path only consists of 3 points, and that's because it it is using the last point from the previous command as it's starting point.
With this, I was able to draw my shapes. However, there was another obstacle ahead, which proved to be the most difficult one. How can I detect a cut in the shape?
How to cut the paths?
My first attempt involved leveraging ChatGPT to render a point on the path. I thought it would be as simple as a few prompts and code snippets. To my surprise, it worked astonishingly well, as you can see in this video:

I even managed to detect where a line intersected with a curve. I could create line segments by saving the the mouse's (or pointer's) positions while slicing. I could then break down the bezier curve in line segments to detect line to line intersections on the curve. Here's the first prototype:

All of this in less than 3 days. I can just call it a day since ChatGPT does everything for me. Oh how wrong I was. ChatGPT could only get me so far. It did help me interpolate a point along a path, and I thought it would be enough without having to understand the math, but that proved to be worth nothing later. ChatGPT couldn't take me all the way. My prompts fell short, or perhaps ChatGPT was out of its depth.
Back to the Drawing Board
To cut the path correctly, I needed a deep understanding of Bézier curves and a new algorithm: De Casteljau's algorithm. The Internet overflowed with daunting math and graphs, leaving me feeling like a student again. It was all overwhelming, and I needed to come up with a strategy.
I found some good videos on YouTube on the topic, which helped me understand the math. I also found some Stack Overflow questions, which pointed me in the right direction on how to do the implementation. I felt like I was back on the school bench, because I studied excessively. I spent 4 or 5 nights after work just trying to understand it, and I was on the verge to give up. Just look at this chaos:

But I didn't give up. Before I threw in the towel, I had an epiphany. IIcan't pinpoint when or where it happened; I might have been dreaming (or having nightmares) about Bézier curves. But something clicked, and I was finally able to create a working prototype. The goal was now within reach, and I could finally continue working on the actual game.
The solution
I knew where on the path I had to split the curve. However, you cannot just make a new point on the curve, you have to take an existing curve, and create two new ones. You also have to calculate the new control points to keep the same curvature as the original shape. Understanding the math was essential in order to do this myself, and I'm glad I spent that time learning the ins and outs of Bézier curves, despite feeling futile at the time.
After several iterations, I was able to cut the shape.

I was able to create two separate shapes from the cuts, and also slice moving objects.

The technique works so well that I can cut objects in any direction, even vertically.

My idea has finally come to life. It was exactly like I had imagined it. It was finally time to create an actual game.
This wasn't easy, I promise you that. I plan on writing a separate post about Bézier curves, explaining what it is and the math behind it. It's not that difficult when you break it down (though it may take some time before it sinks in.) Stay tuned.
Putting it all together
My idea had come to life, and it was time to make some actual gameplay around it. How can I connect the mechanic to the theme? What if players took on the role of a Samurai preparing for battle? That’s what I ended up going for, but the game doesn't reflect the theme very well due to the lack of dialog and art.
I played around with various objects to slice: bamboos, lanterns, blazing arrows and Mongol helmets. While most shapes ended up being squares, the Mongol helmet showcased the cutting edge feature the best because of its irregular shape. Looking back, creating more irregular shapes could have enhanced the game mechanic's unique feature.
Music helps set the atmosphere of a game. I reimagined an old Japanese tune, Sakura, infusing it with a modern twist. It starts with one instrument, sounding something like a shamisen. Later in the tune I added some bass, chords, and drums. Everything was made with the fantastic ZzfxM library and an accompanying tracker.
The sounds are also some semi-random sounds generated with Zzfx. I tried to make a swish/swoosh sound for slicing objects, which I was very happy with. The rest of the sounds are something I just winged for some extra variety.
I’m happy with how the music and sound effects turned out, and creating the music was actually my favorite part of the game jam. It was the only time I didn’t feel tired after long hours of work. It was refreshing, and made me want to make more music.
From here, it was all about creating a game loop. I didn't want to copy Fruit Ninja, so I asked for some advice from other participants. Careless Code (@Twitter) had many good ideas, and I went with one of them; Players could only slice objects of a specific color, either red or blue.

Recruiting play testers
Two weeks before the deadline, I reached out asking for play testers.
Asking on Twitter and js13kgames' Slack channel proved to be a good place to ask for help. The js13kgames community is friendly and helpful. Despite being busy with their own games, they always make time to help other devs. I also asked some colleagues, and got great feedback there too.
The most common feedback I got was about understanding how to play the game. It wasn't immediately clear that players needed to slice objects matching the color indicator at the top of the screen or cut arrows. When you play the same game so many times by yourself, you go blind and don't notice these things. It's therefore crucial to get someone else to play the game.
My five-year-old son is also a great play tester. It's amusing to see him play, because he thinks it's fun, and he doesn't care if something is difficult. He just says what he is thinking out loud:
- "Why did the thing just fall down?" (He discovered a bug)
- "Why can't I cut things?" (He tried to cut an object several times)
- "Why did I die?" (The arrow just hit him)
It's not easy to get feedback without asking specific questions such as
- Was it difficult to slice things?
- Was it easy to understand which color to slice?
He usually just answer "yes," or "no," so observing him play is the best approach to understand what's difficult or not.
Having my son play is the main reason I didn’t add actual humans to the game. It would be cool with rag-doll-like Mongols coming at you, and slice them into pieces. But that’s not something I can show to a five-year-old.
It was difficult to get people to try the web3 features. I even reached out on one of the organizer’s Discord channel, but I didn't get a single play tester. I don't know if the web3 features work well on all devices. I'll know once the judges rate my game.
Embracing the Challenges
Every year, there are several challenges you can embrace if you choose so. This year, I wanted to create a mobile first game. I also wanted to try the decentralized challenges, which also has some prize money (in crypto) for the best games. It’s a niche category, and almost everyone who take on the challenge wins something. Do I recommend doing the challenge because of the prizes? No, I don’t. The work involved using the tech is a lot, and it's taking away time to work on the main gameplay. It’s a motivating factor, but not something I would do unless I was interested. I do however recommend joining if you want to try something new, and also if you wish to receive more feedback on your game after submitting, the categories have extra judges, and the usually write constructive feedback.
I also think web3 can help indie game devs earn income if they’re able to build a community around it. There’s a lot of controversy around web3 these days, and a lot of scams around the tech. Onboarding is not easy, and people love it or hate it. But, I believe being an early adopter can help you in the future.
NFT Swords
I created two swords, which are actual NFTs on the NEAR blockchain. Instead of shipping my own marketplace, I used an existing one, Paras.id. Players can login in to their NEAR wallet, and the game will read their NFTs. If they own one of the swords, they can equip it and use it in-game. Using Paras.id as the marketplace will enable players to easily sell their NFT if they wish. If they do, they won't be able to use the sword in-game anymore. NFTs on the blockchain are perfect for these integrations. I created the NFT collection directly on Paras for this challenge.

I spent a lot of time working on the decentralized challenge, and it’s a shame that all the work I did will only be showcased to a few people. Web3 is such a niche. At least they can preview the swords when they go to the Web3 screen.

Size limitation makes it more difficult
I still needed to keep the size limit not to be disqualified from the overall score, which made incorporating the NEAR API even more difficult. I couldn't include the NEAR API in the bundle, but load it from the Internet at run-time. This approach added several drawbacks:
- Add logic to load script at runtime, only after selecting the web3 menu item
- I needed to access the function on the API with strings, because minification and uglification in the build step obscured the keys otherwise
- Adds extra overhead to the bundle size than necessary
The most furious part was number 2, accessing functions using strings. Here's an example of how I had to do it.
initNear.js
// Example of how I had to access functions on the nearApi.
// I couldn't write nearApi.keyStores, as we usually do
// because we scramble the names at build time, using strings prevent that
function initNear(){
  // get the nearApi that we loaded at runtime
  const nearApi = (<any>window)['nearApi'];
  // Create a browser keyStore
  const keyStore = new nearApi['keyStores']['BrowserLocalStorageKeyStore']();
  const walletConnection = new nearApi['WalletConnection'](near, 'sam');
}